Wednesday, May 26, 2010

Nautical Necklace T-shirt

UM, excuse me, did you see these over on Get Your Craft On! I fell in love instantly & didn't waste one minute getting the stuff I needed to make one for my little Miss!
Go over to Lynette's blog if ya wanna know how I made mine.
I haven't added the bling to mine yet but I'm gonna.
My only regret is that the red isn't as true of a red as I wished for. It's the only one they had. AW well!

it really does look pink in this picture. It's not so bad in person.

My brown haired girl didn't care what shade of red it was - she was just happy that I made her something.
p.s. I just picked this shirt up at Wallyworld for $3.50 ish! I will say this though, it has a slight gather at the neckline and that made it a bit of a challenge to get the dots painted on. I say go for a completely flat shirt - you'll save yourself a bit of time.
Now go make one.
Do you think an adult could get away with wearing one of these?
I might try.
Big Big Love,

Monday, May 24, 2010

Let's BBQ !!! (a fun shirt tutorial)


I just had to get this tutorial up and runnin for those BBQ lovers out there. It is Memorial Day weekend this weekend! HELLO! Can't remember what darling little magazine I just got that they were selling similar BBQ shirts but I just remember thinking -"I'm gonna make that".

Boy's are sooo hard to make things for - I would much rather make my girls something.

This darling boy just beemed with delight when he saw this shirt for HIM!

He wants to wear it to bed & then to preschool tomorrow too!
I started off by freezer paper stenciling the BBQ letters to my shirt. OH and I just bought the shirt at Wallyworld & carefully took the pocket off. It was only $3.00.

Now, if you don't know how to freezer paper stencil - NO WORRIES,

Cheri does & you can watch her do it here. She's amazing & has only boys that she makes darling things for all the live long day.

Alrighty then, once I had that done I drew myself up a hamburger. You can probably come up with a much better burger on your own but, if you don't wanna than by all means just click on my handy dandy little PDF right here and you can print mine out. Thanks to the hubbs who knows how to create PDF's -of course.
You could also add a Hot Dog if ya wanna!


Now, I like to trace my pattern onto Freezer paper so that I after I cut out each little piece I can than iron them to my felt - NO pins needed. I thought you'd like that.

I carefully cut out everything except for the cheese. OH and I threw in the ketchup at the last minute. It's just some wavy lines. If you want it at all.


See how I left a little overhang on the lettuce & the meat & I did it on the cheese too where it inserts into the bun. This way you can overlap things so they look realistic.


Just peel the freezer paper off when your finished.


I just put it all together to see how it would look before I glued & then stitched it down.


Now, you could use some spray adhesive or heat and bond but I just had this handy so I put a very small amount in the center only of each thing and positioned them. I didn't put it at the edges because I didn't want to have to sew through it later. If you dont' want to sew it down at all then glue it at the edges.


Now make sure you layer it from the bottom up just as if you were really making yourself a hamburger.


Then I stitched all the various edges down with matching thread.

I meant to add seasame seeds to the top with some floss but didn't get to it. It would be super cute.
Just for some fun color I added some floss crazy stitches to the shoulders. Cheri taught me that little fun trick too.
Since we are on the subject of BBQ-ing I just wanted to share with you my all time favorite receipe for BBQed chicken. Just grab yourself a packet of this McCormick Grill Mates in Mesquite. I follow the package directions but then I add a 1/2 cup ketchup & a 1/3 cup brown sugar to make it more of a BBQ sauce. Then I put my chicken legs (handle chicken at my house) in it and let sit in fridge overnight. Stick em on the grill the next day & no worries if they get a tad black in some places - I know you don't believe me now but the black is soooooooo good. I've made these many times and everyone always wants the receipe. Let me know if you try it. It really is the best I've had!
Have a wonderful Memorial Day. Let me know if you have any question about the shirt or the Mesquite Chicken. Happy BBQin!

Big Love,
Linking up to these partays

Join  us Saturdays at tatertotsandjello.com for the weekend wrap up party!
The Girl Creative
DIY Day @ ASPTL

Photobucket

Friday, May 14, 2010

All Dolled Up Cardigan

Sooooo, We've been in a sick slump at our house for quite some time. I think we are coming out of it - FINALLY! fa la la la la HOORAY!
I have things to talk to you about - things to share - things to teach you if you will!
For starters lets just doll up a cardigan whatayah say!
I saw these cardigans at Target & thought they were cute enough, but, there's always a but !
I didn't want long sleeves because I don't know about where you live, but, here in my place of origin the weather goes from COLD to HOT in about 9 seconds flat. We don't really have much of a spring per say. So ixnay on the long sleeve.
Here is my pretty little Miss in her new cardi!

This is going to be a pretty general tutorial because first of all everyone has done some sort of ruffle makeover lately and secondly my son got ahold of my camera and deleted several of my picture steps! Sorry bout that! Still love that boy!
Ok, so if you wanna cut off the sleeve on something why not just save the cuff down there and reattach it up were you want it. Right! Genius! See how I cut that middle section out. Save that by the way to make the ruffles.
I cut my cuff off right next to the serged edged so it would still have a nice finish. Even though knit material really doesn't even fray.

Now just put the two right sides together with the raw edges meeting and stitch it all the way around . After you flip that cuff back down ( no picture - thanx much Son) just top stitch it down real pretty like.
I added a raw edge swirly flower on top of the ruffles. I just ripped the width of fabric I wanted to give it frayed edges. Mine was about 3/4 of an inch wide. Start in the middle of the flower and work your way out -bunch the fabric as you go to create the gathers.


Add some cute pockets to the sides. It had little white pockets before - I seam ripped those off. This is just a very big pocket that I pleated in the middle and add some trim to the top.


Here's those ruffles you can make from the sleeve leftovers. I just cut the sleeve into 1 1/2 inch strips and again I just bunched as I sewed to create gathers. I went up the shoulder and even all the way around the back.


HELLO, you can't tell me she isn't darling!
I love sleeves that hit at the elbow - love them.


Got any questions? Happy to help! If you wanna see the pattern I drew up for the pocket let me know I'd be happy to post it. It's my favorite pocket EVER! I've put it on quite a few things!
Thanks for letting me share!
Big Smiles,
Link'n up with Join us Saturdays at tatertotsandjello.com for the weekend wrap up party!
Funky Junk Interiors


Monday, May 10, 2010

A Word About Being A Mother

Being a mother is not the easiest thing in the world! Am I right?
Being a mother is the most rewarding job there is.
Being a mother is emotional.
Being a mother is accepting the differences in your children with open arms.
Being a mother is constant joy & sorrow.
Being a mother is all I ever wanted to do.
I wanted the perfect mother's day shot & I have decided this is it.
I love the nose picking, the happy clapping, the slouch of I don't want to sit here & of course the happy child.
I LOVE being a Mom! What a blessing.


Wanted to share with you what I gave myself for Mother's Day this year. Don't laugh, alot of you bought your own Mother's Day gift - I know you did. Oh and don't judge because Mr. Holyoak bought me a bush (just what I wanted) & did everything & I mean everything for me.
Sunday morning I got up and said to myself, "By darn Jen you need something fun to wear to church , I mean come on it is Your day." So I concurred with myself and went to work on my garage sale find. It was this skirt that I bought for a buck. While it was cute - it lacked spunk. I just dolled it up a bit with some frayed , layered applique. Wanna know more about that technique then you should definately visit the D.I.Y. dish. It was super easy!


OH and don't forget to use my tutorial and make yourself a matching corsage pin.
I know Mother's Day is over but do it anyway. You deserve it!


Hope your Mother's Day was as wonderful as mine was!
OH and Mom, I love you to pieces!
You're the reason I always wanted to be a Mom -you just made it look so fun!
Love & Smiles,

Friday, May 7, 2010

Let's Paartay!

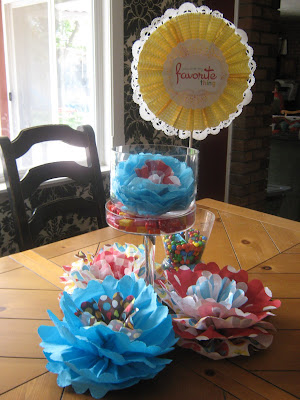
So, I know I've mentioned Made before but I'm sorry, Dana just has some darling ideas! DARLING! Yesterday as part of her Mothers Day Celebration she showed us that we could use paper napkins for those darling Martha flowers. HELLO!!! Genius! It looks like fabric and I love fabric. Well, it's someones birthday at my house and that little darlin is having a very special 8th birthday. I have a tradition of making a fun birthday table for the birthday person & Dana made my day sooooo easy with her fun idea! Thanks Miss Dana! I doubt she reads my blog so tell her for me if you see her! HEE HEE!
p.s. I got the napkins at Target! They had tons of darling ones!


Interested in making one of those lollies! You can find the tutorial for that over at the fabulous Rhonna Farrer's blog. She's amazing too! I had the privilege of interviewing her at a Mom's Who Make It Conference - Last July. I was a correspondent for Daria of Boutique Cafe! How fun is that! Well, I'll tell you - sooo fun!

Happy Happy Birthday Sweet Anna girl!
Smiles,

Monday, May 3, 2010

Clutch Giveaway Winner! Whoot Whoot!

Alright, it looks as if it's lucky #31. This was a bit hard for me because I wanted to be fair and count even multiple entries within one comment. I counted down 31 comments about 5 times and every time it was : Just me and Z (see below for comment)
Yahoo for you lucky lady.
I will be in touch to find out which one is your fav.
Thanks to everyone for entering!


Smiles,