Monday, December 13, 2010

Ballard Knock-Off Ornament Pillow

When I got my Ballard Designs catalog in November I spotted thee most adorable Holiday pillows with some big price tags. I immediately thought I'ma gonna make those! Well, I'm sure you've already seen Jen's of Tatertots & Jello version of them - I did and Jen I love em. 
Here's mine. 
I don't have a tutorial but it's pretty easy peasy!
I just did some freezer paper stenciling for the brown ornaments & then appliqued on the other two with some decorative stitching.  Added a bit of real ribbon here and there for some texture.  VIOLA!! This pillow is super GRANDE I might add - I had to use a King Size pillow to stuff it.


Thanks for reading my blog!
Big, Big Love

participating in these link ups:
HollyBloggyButton1
The DIY Show Off

Friday, December 3, 2010

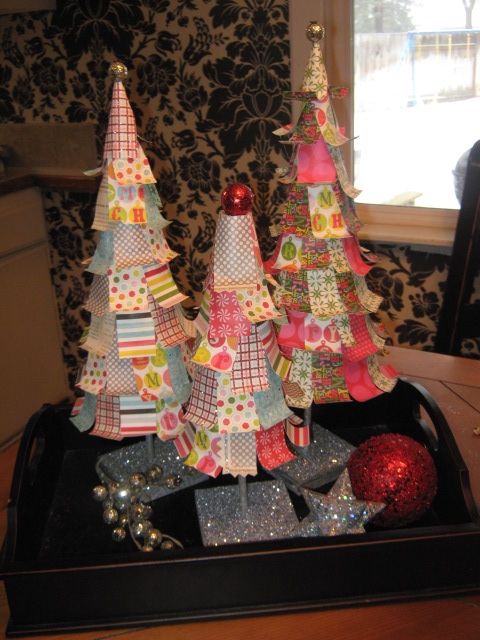
Funky Paper Christmas Trees Tutorial

So, I know that there are a few different versions of paper trees out there but, I can't resist showing you my take on the ole Paper Christmas Tree.
I decided to do a tutorial about half way through making these and so the photos are lacking but its pretty easy to grasp.  These ones below are the ones I just finished up last
night for my cute Mom.  Sorry Mom if you read this - hate to spoil your surprise. She, like myself loves fun & funky things!

I've really gone a bit crazy making these, in fact I'm doing them for teacher gifts. Here's my kitchen tree.  This is what we call the straight version - no curls on the ends of the
branches. ( if you want curls just curl the ends around a pencil) I just put this one in a pot I already had.


These ones here are the first ones I ever made & that was
about 3 years ago - I've added new ideas to my current ones
that these don't have - like the glittered bases.  However,
one thing I've always loved about these ones is the ornaments
I hung from them & the star on top.


It's an awesome project for kids too - infact let them make their
teacher gifts. My sweet girl made this one below for her
bedroom.  Love it!  No trunk on this one but still
darling!


Ok, so you are gonna need these things:
1-paper mache or styrofoam tree shape
several different fun papers ( I used 12x12)
a dowel - I used 5/16 but it don't matter
a wood base with hole drilled the size of dowel
hot glue gun
paint ( I used silver)
glitter - totally optional but Oh how it sparkles!
something fun to put atop your tree

Let's get started.  I used 12X12 sheets of paper and cut 3" X 11/2" strips from that - with no wasted paper.


Here's were my pics are lacking.   Start at the bottom of your tree form & work your way to the top.  Working with your hot glue gun now put a strip of glue across the top of one of your paper strips and glue it so that about half of the strip is hanging below your tree form. The next strip will slightly overlap the one before it.  As you
work your way up the tree stagger your strips of paper and make sure you always overlap the row below by about 1" or half of the paper length.  When you get to the top the last couple of strips will need to be wrapped all the way around the skinny point.  Just pull it tight and it will look nice. Then just glue your bobble to the top of the tree - be it star or glitter ball.


Cut your dowels to the length you want & paint them up.  I painted mine silver.  I also painted my bases silver.


I was in a hurry & wanted to skip a step and so when my paint was still wet I poured the silver glitter on.  No glue needed right.
You may have a lovely storage room for all your Christmas decor with big tall shelves but this girl over here only has a storage shed full of big rubbermaid bins - So,  I chose not to glue the dowel inside the tree base.  It perches on top of it beautifully & then I can take them somewhat apart for compact storage.  I did glue the dowel into my base however.  If you use styrofoam bases just shove the dowel up the center of that and it will hold.  By the way, I bought my paper mache trees at Craft Warehouse.  They had two sizes. 


These ones here are my vintage trees & they are a gift for my beautiful sister Amy Kate!  Hope you  like em sis! 

 While giving one of these trees is very thoughtful - I think they belong in threes. Have you ever heard the Tale of Three Trees? It's a beautiful story to share this time of year.  In fact I keep my copy right next to my three trees.  I hope you will read this story and share it with others.  I love this beautiful Christmas Holiday doesn't it just bring a happy song to your heart. 
Big, Big Love,

I'm linking up with these folks: 
Join us Saturdays at tatertotsandjello.com for the weekend wrap up party!


HollyBloggyButton1

Sunday, October 3, 2010

Halloween Collage with Love From

These are my girls - my two oldest. Aren't they lovely? I adore them!
I just wanna share with you a little somethin that my oldest Little Miss made for me.
She is extremely talented in many areas but her greatest love is Art.
While her talent doesn't exceed her beauty it is amazing non-the-less!

I gave her a canvas & this is what she made of it!
I know, I know!!!!
I told you!!
Let's see those details shall we.
OHHH I love that creepy tree!
This will be displayed every Halloween season from now till the end of time.
I LOVE IT!
Thank-you my girl!
Love you, Momma


Join  us Saturdays at tatertotsandjello.com for the weekend wrap  up           party!

UndertheTableandDreaming


Friday, October 1, 2010

More Halloween Lovin - A Wreath Tutorial

I've never felt so on the ball - it's October 1st and all of my Halloween decorating is done. Don't know bout you but that never ever happens around these parts. I finished up this wreath yesterday and just wanted to share it with my bloggy friends. Saw a great tutorial for a wreath much like mine here at Craftaholics Anonymous and I was orignally going to make it but my mind got to spinning and I added a bit of my own touch to it.

So, here is what you need
A wreath form - got mine at the Dollar Tree
Halloweenish fabric scraps I used 5 different ones
about 3/4 of yard of Black Burlap
wooden letters B O O
purple paint & glitter
Hot Glue gun
I cut the burlap into 1 1/2" by 15 " strips
Then I cut the fabric scraps into 1" by 10" strips

First wrap the wreath form with some of the black burlap. I used a dab of hot glue at the beginning and a bit here and there along the way and then of course to secure it at the end.


Then just go to town on tying the burlap and fabric strips around your wreath form. Tie in a knot. For mine I would tie two burlap strips together and then 1 or 2 fabric scraps and then 2 more burlap strips .


You can fill in with the fabric scraps here and there if you think it needs it.


Then I painted my letters purple and when that was dry I mod poged the tops and covered them in purple glitter.
Once they were dry I glued my letters together in a pleasing manner - make sure and rub off the glitter where you are gluing them together. It will stick better.
I had tied my fabric and burlap strips so close together that I was worried about where to glue on my letters so I decided I would tie them on too. I used the ole loop pull through method to attatch the fabric to the letters. Then I just tied them to the wreath like I had tied the fabric strips. Easy peasy!

I wish my door was black but alas it is not and so red will do. I left the cobwebs on the door to make it more Halloweenish - Right!
Don't you just love Halloween & Fall & Crafting!
Well Don't you?

Hope your weekend is fantabulous!!!
Smiles,

I'm participating in these link parties:
giveaways


Join  us Saturdays at tatertotsandjello.com for the weekend wrap  up           party!


UndertheTableandDreaming

Saturday, September 25, 2010

Halloween Lovin

I admit it , I sometimes go a bit over board but I adore Halloween and I just thought I would do a little show & tell with my decorations. Enjoy & Happy Haunting!!!


Thanks to House of Smith's I now have a darling table display! Yahoo for great tutorials.

My Halloween Mantel
Oh Jen, thanks for the idea on the spider specimen art. Find that tutorial here on Tatertots & Jello! I also made that cute pumpkin (can't see it to well) it's from Sandy Henderson's new Shabby pumpkin pattern .
My daughter made me the Magic Book of Spells - how cute is that! Love you my girl!
Thanks for the awesome bottle Jess.
I have a few more ideas from Blogland that I still want to do so I'm not quite ready for Halloween. OHHHH yah and then I better make the kiddos their costumes. Let the holiday maddness begin. I say Bring it on!!!
Big Love,

Join  us Saturdays at tatertotsandjello.com for the weekend wrap up           party!

Friday, September 17, 2010

Big Big Thanks

I know , I know, I've been missing for a long, long time around here but things are slowing down a tad and I'm back. First things first, here is a big thanks from my good friend Heather regarding all the talented and generous ladies who donated to the Cure JM benefit auction.

I want to give a special thanks to all of the lovely ladies who generously donated to the Cure JM Auction that was held on September 10, 2010 in Hillsboro Oregon. It really warmed my heart each time a package would arrive on my doorstep. Each hand crafted items was made beautifully and crafted with love. Many people have never heard of Juvenile Myositis unitl now and not only did they want to know more about the disease they wanted to help us in our quest to raise money to help fund the necessary research for a cure.
I have never been to an auction before this night and let me tell you that there was so much energy, so much excitement and so much love and hope being generated. Each item had multiple bids and although I don't know the exact amounts each item sold for I am happy to share that The Cure JM Foundation was able to raise close to $20,000.00 that night. This is amazing and I have each of you who donated to thank.
I would like to give a special thanks to the following people:

Jen & Mitzi of www.dangerouslydomesticjen.blogspot.com Double sided apron, Large quilted hand bag and small book bag
Cheri at www.iammommahearmeroar.blogspot.com Cardigan, leather diaper clutch, head band, 2 boys shirts, pink onsie with knit collar and little girl blue skirt, little girl pink skirt with flowers
Jennifer at www.tatertotsandjello.blogspot.com Burlap magnetic board, 2 burlap bracelets, a burlap necklace and a burlap pillow case
Brittany at www.lovestiched.blogspot.com $20 gift card to her Etsy shop

Thank you so much for writing about The Cure JM Foundation and inspiring and encouraging followers to donate their lovely items to such a worthy cause. Because of you we received items generously donated from:

Emily C. from Sew Super Sweet in Texas 3 waiste aprons
Tricia J. in Idaho 2 prints of her watercolor paintings
Amber F. from Baby Threads and Such in Tennessee Diaper bag, winter hat, little girl shirt, and soft baby square toy
A. Taylor in Wisconsin soft red baby blanket
Shelly B. in Texas Knitted teddy bear, knitted baby girl hat w/flower, knitted worm and apple, knitted pear and snail and a cloth doll
Laura W. in Utah Cute baby onsies with and elephant on one, and a pear on another and a stiched necklace on a onsie with a skirt.
Lisa J. in Oregon 2 refinished 1970 style chairs.

Thank you ladies for your hard work and generous heart. Thank you for giving to a worthy charity. Thank you for raising awareness about an orphan disease. Thank you for Crafting for a Cure. My heart is full. You made a difference in the lives of these young children. From all of the volunteers at the Cure JM Foundation and from the bottom of my heart, we thank you.

Sincerely,
Heather Dallmann


Thank-you ladies what an amazing job you've done, you've made a difference in the lifes of many.
Big Big Love,

Friday, July 23, 2010

I'm Donating - How Bout You?


I have been so overwhelmed by the response to my previous post about crafting for a Cure. Nearly every blogger I contacted agreed to both donate something to the Cure JM auction and to blog about it. In turn others have come out and said that they too would donate their creations. I would like to give a special thank-you to those who were willing to help.
Also, to all those who offered their items as a result of these bloggers putting this information out there. I love you guys & appreciate your thoughtfulness. If you ever need a favor don't hesitate to call on me. Now, if you didn't get a chance to donate to Cure JM than it's not to late. The items don't have to be mailed till August 31st - you have over a month to come up with something.
Here's a little showcase of what I'm donating. I know what you are thinking aren't those Halloween decorations in the background - and I say to you , YES they are and here's the reason. The "real" apron I'm donating is only half way done (typical Jen), I'm a last minuter (real word). So, I'm showing you one I made for a friend back around Halloween. It's reversable! Yeehaw!


I will also be sending over one of these baby headbands.

Some of these fabric hair flowers
These particular ones are the ones I made for my beautiful niece who is getting married next week. I made her an arrangement to go on her dress too & still need to finish the ones for all of her sisters. Now you see why I'm not done making my CURE JM auction items. One thing at a time. Right!?
OH and I will also be throwing in one of these ever so popular camera strap covers. This is the one I made for my family reunion auction and this is my half faced beautiful sister modeling it. She was the lucky winner! Love you Ging!
Thanks again Ladies, Big Big Love,