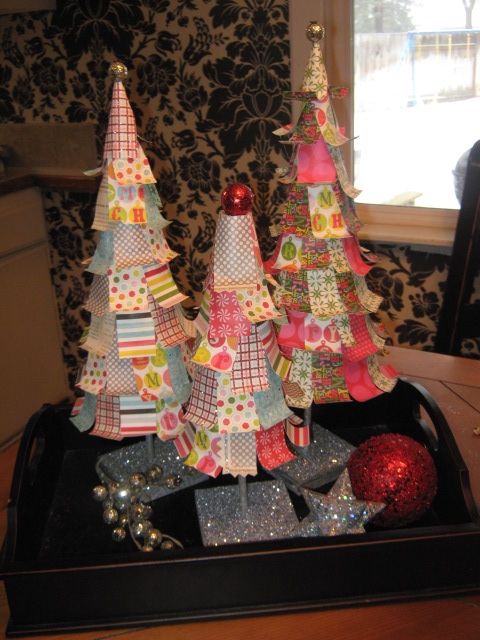
So, I know that there are a few different versions of paper trees out there but, I can't resist showing you my take on the ole Paper Christmas Tree.
I decided to do a tutorial about half way through making these and so the photos are lacking but its pretty easy to grasp. These ones below are the ones I just finished up last
night for my cute Mom. Sorry Mom if you read this - hate to spoil your surprise. She, like myself loves fun & funky things!
I've really gone a bit crazy making these, in fact I'm doing them for teacher gifts. Here's my kitchen tree. This is what we call the straight version - no curls on the ends of the
branches. ( if you want curls just curl the ends around a pencil) I just put this one in a pot I already had.

These ones here are the first ones I ever made & that was
about 3 years ago - I've added new ideas to my current ones
that these don't have - like the glittered bases. However,
one thing I've always loved about these ones is the ornaments
I hung from them & the star on top.

It's an awesome project for kids too - infact let them make their
teacher gifts. My sweet girl made this one below for her
bedroom. Love it! No trunk on this one but still
darling!

Ok, so you are gonna need these things:
1-paper mache or styrofoam tree shape
several different fun papers ( I used 12x12)
a dowel - I used 5/16 but it don't matter
a wood base with hole drilled the size of dowel
hot glue gun
paint ( I used silver)
glitter - totally optional but Oh how it sparkles!
something fun to put atop your tree
Let's get started. I used 12X12 sheets of paper and cut 3" X 11/2" strips from that - with no wasted paper.

Here's were my pics are lacking. Start at the bottom of your tree form & work your way to the top. Working with your hot glue gun now put a strip of glue across the top of one of your paper strips and glue it so that about half of the strip is hanging below your tree form. The next strip will slightly overlap the one before it. As you
work your way up the tree stagger your strips of paper and make sure you always overlap the row below by about 1" or half of the paper length. When you get to the top the last couple of strips will need to be wrapped all the way around the skinny point. Just pull it tight and it will look nice. Then just glue your bobble to the top of the tree - be it star or glitter ball.


Cut your dowels to the length you want & paint them up. I painted mine silver. I also painted my bases silver.

I was in a hurry & wanted to skip a step and so when my paint was still wet I poured the silver glitter on. No glue needed right.
You may have a lovely storage room for all your Christmas decor with big tall shelves but this girl over here only has a storage shed full of big rubbermaid bins - So, I chose not to glue the dowel inside the tree base. It perches on top of it beautifully & then I can take them somewhat apart for compact storage. I did glue the dowel into my base however. If you use styrofoam bases just shove the dowel up the center of that and it will hold. By the way, I bought my paper mache trees at Craft Warehouse. They had two sizes.

These ones here are my vintage trees & they are a gift for my beautiful sister Amy Kate! Hope you like em sis!
 While giving one of these trees is very thoughtful - I think they belong in threes. Have you ever heard the Tale of Three Trees? It's a beautiful story to share this time of year. In fact I keep my copy right next to my three trees. I hope you will read this story and share it with others. I love this beautiful Christmas Holiday doesn't it just bring a happy song to your heart.
 Big, Big Love,
I'm linking up with these folks:


